
This post is part of a larger 4 step series, check them all out:
Step 1: Using the Star Adventurer Tracker
Step 2: How to Shoot the Moon
Step 3: Choosing Gear for Deep-Sky Imaging
Step 4: Shooting Deep-Sky Images
Here is the typical process for actually taking deep-sky images in the field.

Step 1: Set up the Mount
The mount needs to be accurately polar aligned, a step you learned by using a tracker (see Astrophotography Tutorial Step 1: Using the Star Adventurer Tracker).
For the mount’s GoTo system to find targets, it must also be aimed at two or three alignment stars, a process you can practise in the backyard with an eyepiece to learn how to find things visually. See Using Your First Telescope — Part Two: Aligning a GoTo Scope. (Coming Soon)
Step 2: Focus
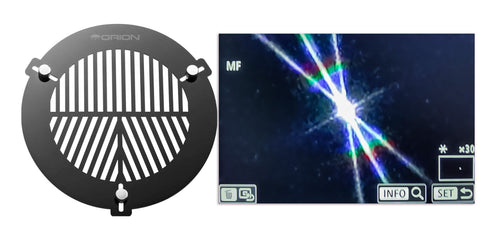
With a camera attached, and the telescope cooled to the nighttime temperature, focus the telescope by first aiming at a bright star. A low-tech accessory called a Bahtinov mask (we sell a selection) placed over the front of the telescope makes it easy to tell when the star is precisely in focus, by centering the middle diffraction spike between two adjacent spikes of light, as shown.
Now use the GoTo system to move to the target. Don’t forget to remove the Bahtinov mask! Everyone makes that mistake … once. Or twice!

Step 3: Frame
With a DSLR, set the ISO up very high (25,600 or more) and, just as with a tracker, take short exposures of 15 or 30 seconds. The image will be very noisy, but the point is to just see the object and adjust the framing. Remember to lower the ISO when shooting the final images!

Step 4: Shoot Short and Lots
When using a DSLR or mirrorless camera, a good way to start, even from within city limits, is to select a bright target like the Orion Nebula or the Andromeda Galaxy (shown).
With the mount tracking at the sidereal rate, use an intervalometer to fire the camera for lots of short 60-second exposures at a high ISO of 3200 to 6400.
Just as with a tracker, stacking a few dozen such images (tossing out any that appear trailed) will net you initial results you can be proud of, and that will give you valuable experience polar aligning, focusing and framing targets.

Step 5: Add Auto-Guiding
The best practice is to shoot fewer but longer exposures of several minutes each and at a lower ISO for better dynamic range and detail, and stack those. However, even the finest mounts will typically not track accurately enough for several minutes without assistance.
To provide that aid, we add an “auto-guider,” a small-chip camera attached to a little 30mm to 50mm guidescope. Its job is to monitor the positions of guide stars near the target. The camera feeds its images into auto-guiding software on a computer. The free program PHD2 Guiding is popular. As soon as the software detects that the stars have wandered off, if only by a pixel, it issues commands to the mount to correct its aim.
There are many choices for auto-guider cameras. Some of the most popular are from ZWO that work with their little ASiair Plus computer that runs a version of PHD2. The ASiair is set up using the ASiair app running on a phone or tablet (Android or Apple iOS), for much more convenient control than using a laptop at the telescope.
So we’re not done buying gear! An auto-guider is recommended for the best results.

Step 6: Automate!
The ASiair can also control many Canon and Nikon cameras, as well as all ZWO cooled astro cameras, and ZWO auto-guiders. And it can control many GoTo mounts.
Using the one mobile app, it is possible to: set up a sequence of images, program the targets to be shot, centre them by analyzing the star field (called “plate-solving”), start the auto-guiding, control the main camera, and store the images.
Adding a motorized focuser like ZWO’s EAF (Electronic Auto Focuser) also allows the app to automatically focus the camera, both at the start of the night, and periodically throughout the night as the temperature changes, shifting the focus.
The ASiair communicates with your phone or tablet via WiFi, making it possible to remotely control your rig from the warmth of your car or home! You can even set up a night’s worth of multi-minute exposures for multiple targets, then go to bed!
Many astrophotographers consider the ASiair a revolutionary product that has changed the way they do imaging.

Step 7 and Beyond: Processing!
Acquiring all the requisite images (called “light frames”) is just the start. Taking “dark frames” (to record just noise) and “flat-fields” of a uniformly lit panel (to record uneven field illumination and dust spots) is also common practice.
All these frames are mathematically combined using stacking and “calibration” software such as Affinity Photo, Astro Pixel Processor, Deep Sky Stacker (Windows only), Siril, Starry Sky Stacker (MacOS only), or the very complex but powerful PixInsight.
That step yields a base calibrated image, one that still needs a great deal of processing to tease out the maximum details in deep-sky objects, using programs such as Affinity Photo, PixInsight, or Adobe Photoshop (shown).
Processing is half the hobby — and fun! — of deep-sky imaging, and the subject of many books, workshops, and YouTube tutorials!