QHYCCD Q-Focuser


QHYCCD Q-Focuser
Style - Standard (QHY-QFOCUSER-STD)
Why Purchase from All-Star Telescope?
Free Expert Support
Whether you are a first timer needing help with setting up or an enthusiast that can't quite make that one thing work, our expert staff are ready to support your needs. With decades of knowledge and first hand experience we've been there and we can help you through it!
Stress Free, Secure Transactions
You can trust purchasing and delivery with All-Star Telescope. All of our transactions are 100% secure and Level 1 PCI DSS compliant thanks to Shopify's ShopPay platform. For additional protection, we insure 100% of the value of every shipment we make. If it get's lost during shipment, we replace it. If it gets damaged during shipment, we replace it. We make sure your product arrives exactly as you would expect it to; we promise.
We also ensure privacy protection. We never keep any of your credit card information on file and any of your personal data is stored according to our policies.
30 Day Return Policy
Buy with confidence knowing that we accept returns up to 30 days after purchase. We want you to have something you will actually use and we are confident that we keep good quality products in our store with No Junk.
Price Match Promise
Shipping around for the best price is tough, we make it easier by offering the best pricing in the market. But if you find a better price on an in-store item somewhere else we will match it!
Product Description

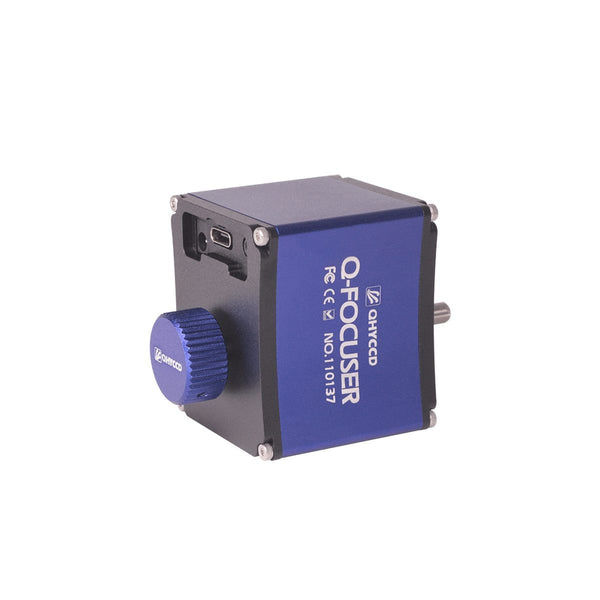
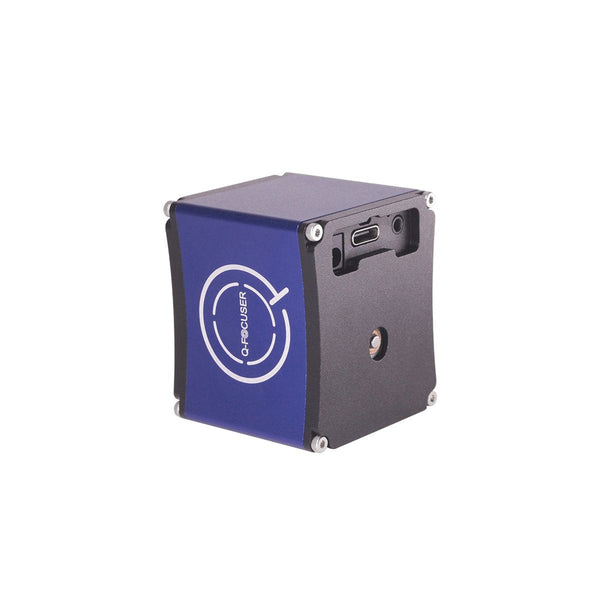
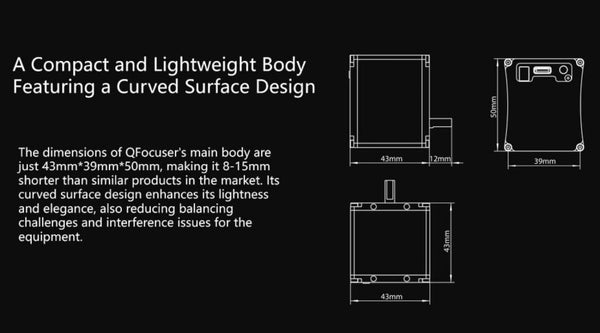
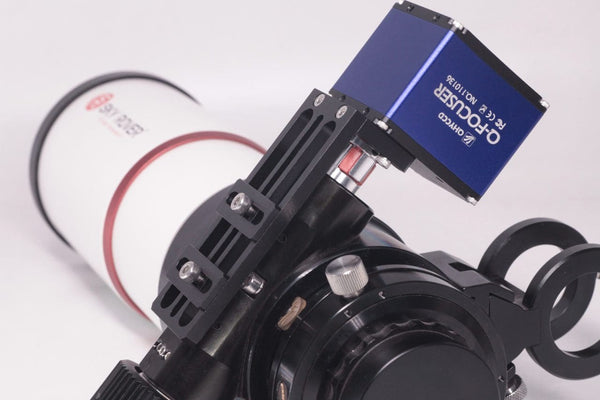
QFocuser incorporates curves into its body design, adding a touch of elegance to its small size.

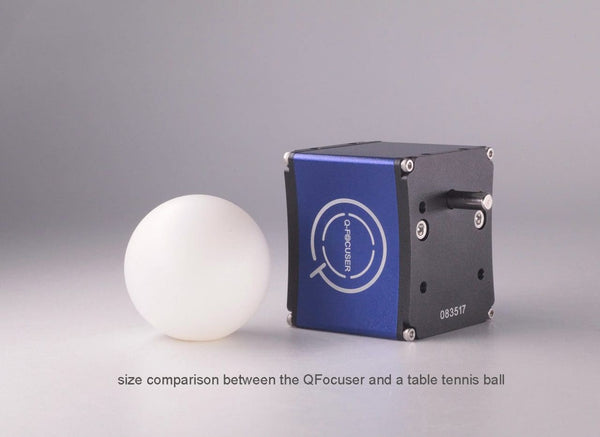
The QFocuser is exceptionally small!

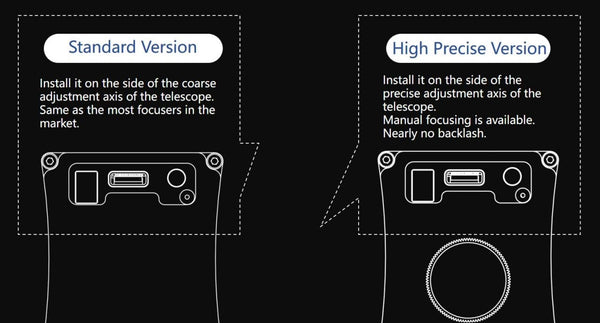
QFocuser comes in two versions: Standard Version and High Precision Version.
The Standard version is designed to be installed on the side of the standard adjustment axis of the telescope focusing mechanism. This is the same with most focusers available in the market. The High Precision version is installed on the other side — the precise adjustment axis of the telescope focusing mechanism.

QFocuser (Standard Version)

QFocuser (High Precision Version)

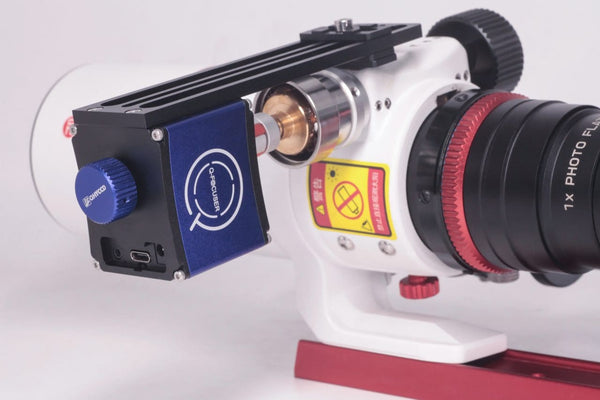
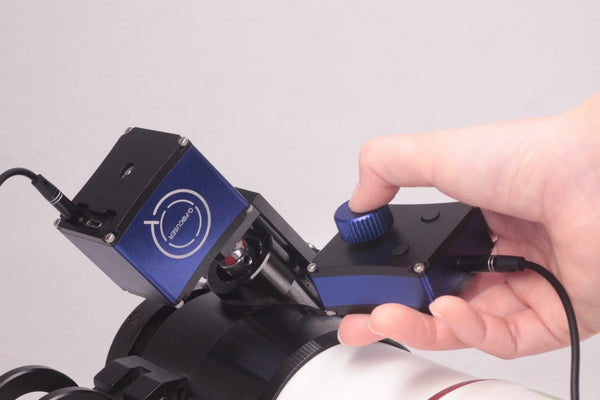
Most electric focusers use a motor and reducing gears and once installed on the telescope manual focusing is not possible. However, the High Precision QFocuser is equipped with a non-reducing motor, allowing it to be manually adjusted even after installation on the telescope, without the need for a power connection or a clutch switch.
Another advantage of QFocuser High Precision Version is that it allows the entire system to achieve almost zero backlash. Backlash calculations involve the entire focusing system, including the focus motor mount, not just the electronic focuser itself. Backlash will exist if there are mechanical gears in the focusing system. Since the High precision QFocuser uses a non-reducing motor (i.e., no mechanical reduction gears) the added backlash from the motor is almost zero. Then, if a good focusing mount is used, the entire focusing system will operate with almost zero backlash. According to our test in NINA, with the backlash set to 0 in the Autofocus settings, the autofocus process runs smoothly.

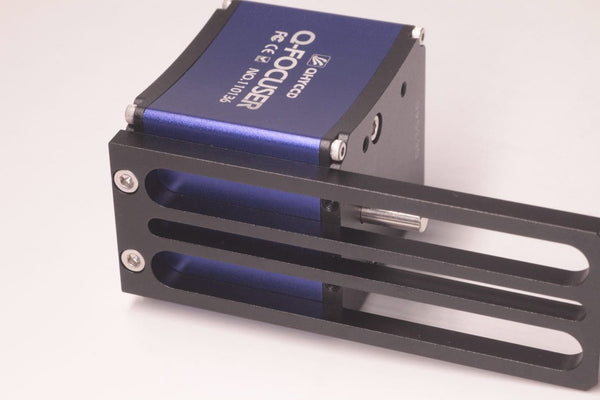
Multiple Installation Options
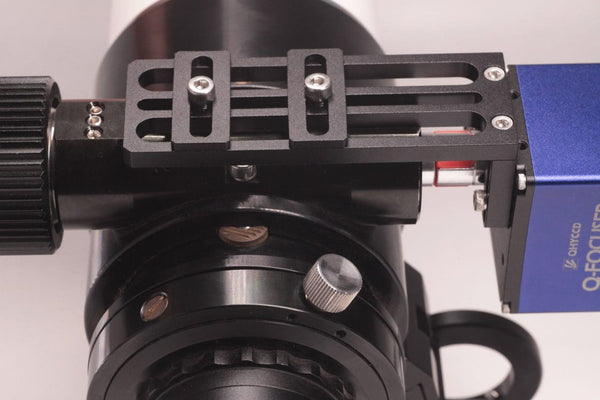
QFocuser features several holes on its bottom and side, providing a variety of fixing methods. Unlike mounting plates with fixed holes, QFocuser adopts a flexible structure where the fixed holes position and mounting plate height can be freely adjusted to achieve the best compatibility with your telescope.


Software and Interface
QFocuser can be powered in two ways: TypeC-5V and 12V DC. Tbe USB 5V power is enough in most cases. Both the standard version and precision version support an external temperature sensor (included) for users who require temperature monitoring.
Additionally, a manual controller will be available as an optional accessory in the near future. This item allows direct operation of the electronic focuser without the need to connect it to a computer or touch the focuser.

Currently, QFocuser supports both Windows (with ASCOM drivers) and Linux systems. In the ASCOM driver, we have integrated basic functions such as move, custom current position, limit switches, torque maintenance, and temperature display, etc. It can also be controlled through other third-party software.

User Guide
Hardware Installation
1. Remove the precise/coarse adjustment knobs from the focuser mount of your telescope, and install the coupler to the focusing bearing.

2. Install the long mounting plate on the focuser body and fix it with screws.

3. Connect the motor shaft of the electronic focuser to the telescope’s focusing bearing through the coupler.

4. Adjust the installation height and secure it tightly with small mounting plates and screws.

Driver and Software
Product Driver Operating Environment:
Computer System: Windows 7 and later versionsSoftware Version: ASCOM platform version 6.5 and aboveThird-party Software Support: Supports N.I.N.A., MaxDL, and other third-party software that supports the ASCOM platform.
Product Connection and Use (Using ASCOM driver version 6.5 and NINA 2.2 as examples):
1. Remove the fine-tuning knob of the astronomical telescope’s focusing mount. Use couplers to connect the motor shaft of the electronic focuser to the focusing shaft of the telescope. Use the mounting plate to connect the body of the electronic focuser to the body of the telescope securely.
2. Download and install drivers and software:
- a. Download and install the ASCOM platform (version 6.5 or above) on your computer. Official download link: https://www.ascom-standards.org/
- b. Install the ASCOM driver for the electronic focuser. Note: Do not connect the electric focuser to the computer during the driver installation. https://www.qhyccd.com/file/repository/publish/ascom/QFOCUS-ASCOM-Platform6-V23.08.16.16.exe
- c. Download and install the third-party software, using NINA as an example here. Official download link: https://nighttime-imaging.eu/
- d. Download and install the system driver for the electronic focuser: USB_Virtual_Com_Port_Driver. Official download link: https://www.qhyccd.com/file/repository/publish/qfoc/USB_Virtual_Com_Port_Driver_v2.0.2.2673.rar
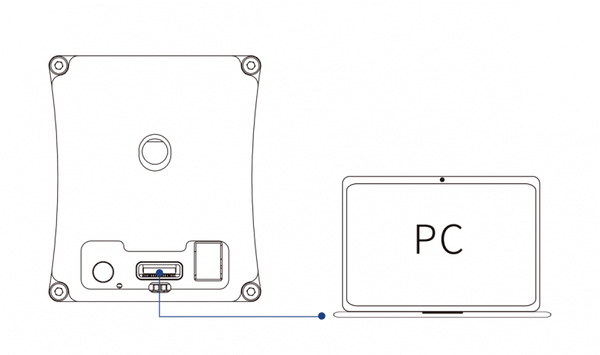
3. Connect the electronic focuser to the computer using a USB-C cable.

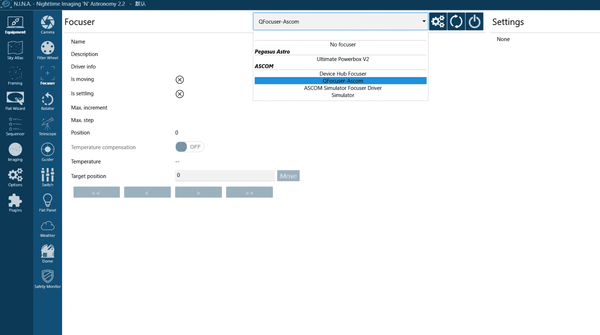
4. Open NINA and select “Equipment”-“Focuser”-“QFocuser-Ascom”

5. Click the Cogs button to start the basic operations and parameter setup for the electronic focuser.


The ASCOM control interface of the QFocuser includes some basic control options. Most of these functions can also be operated within third-party software. If the third-party software you use does not support some of these features, you can operate them in the ASCOM control interface. The following is based on the ASCOM control interface:
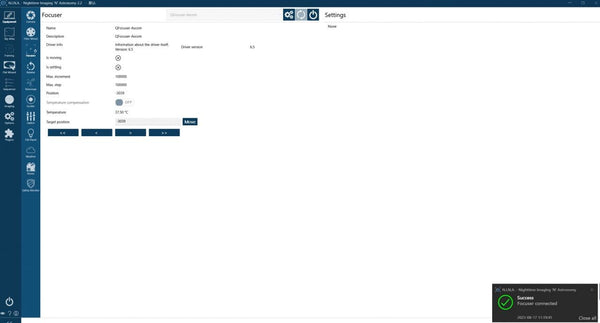
- a. Connect: Click “Auto,” and the system will automatically detect the COM port occupied by the QFocuser and display it in green to indicate successful recognition. If automatic recognition fails, you can invoke the computer’s device manager to view the COM port where the QFocuser is located and manually select it from the drop-down menu.
- b. Language: Select English or Chinese in the upper right.
- c. Move: Enter a number in the box as the number of steps to move at once. The left arrow indicates moving X steps in one direction, and the right arrow indicates moving X steps in the opposite direction. Check “Revert,” and the rotation direction of the electric adjustment axis will be opposite to the default direction. Check “High Speed,” and the electric adjustment will move at a faster speed.
- d. Current Position: The position coordinate of the electric adjustment currently recorded by the system.
- e. Custom Position: Change the current position coordinate to any number greater than or equal to 0. For convenience, if the current position of the telescope focus tube is at its limit, we recommend changing the position to 0; if it is near the focus point, we recommend changing it to a larger number, like 2000, to facilitate software autofocus. This position will also become the center position for the Limit function.
- f. Limit: Limits before and after the custom position. For example, entering “500” in the limit number column means the focuser’s movement range will be restricted to ± 500 steps from the custom position, and it won’t move beyond this. This setting primarily prevents the electronic focuser from turning too far and damaging the telescope’s focusing structure in some cases.
- g. Keep Force: If checked, the electronic focuser motor will remain powered even when stationary. This is for situations where the electronic focuser has a large load, and the motor might rotate backward when not powered or to maintain mechanical temperature in cold environments.
- h. Out Sensor: Only check this option when an external temperature sensor is connected. The current ambient temperature will be displayed here. If checked without connecting the temperature sensor, a reading error will occur.
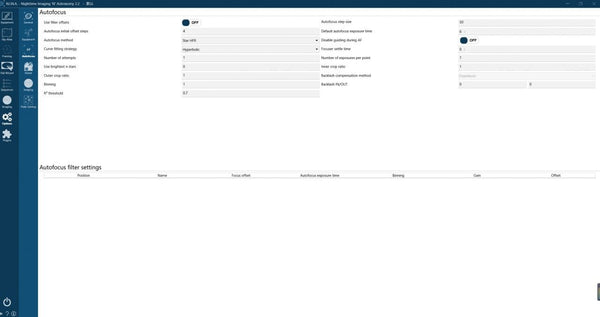
6. After configuration, click “OK”. Click the power button to connect the focuser to NINA. If successfully connected, a notification will appear in the bottom right corner of the software. Then you can further set auto-focus related parameters in NINA > Options > Autofocus, such as focus method, exposure settings, backlash adjustments, etc. For details, please refer to the official NINA software tutorial.


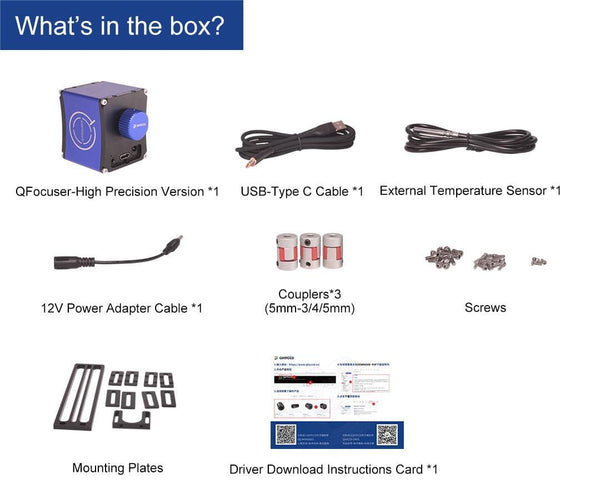
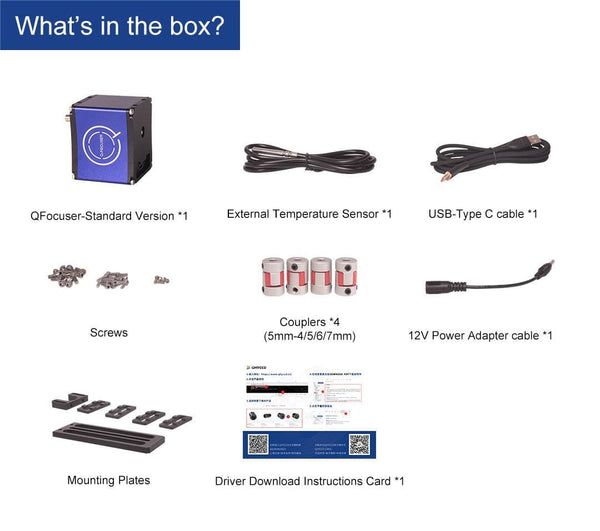
What's in the Box
Specifications
| Version | QFocuser(Standard Version) | QFocuser(High Precision Version) |
| Body Size/mm | About 43*39*50 | About 43*39*50 (excluding the button) |
| Weight | About 210g | About 265g |
| Motor | Reducing motor | Non-reducing motor |
| Backlash | It has some backlash, which can be calibrated in software like NINA | Almost zero backlash* |
| Max. Loads | About 10kg | About 7.5kg |
| Manually Focus After Installing | Not supported | Supported |
| System Supported | Windows (ASCOM)
Linux |
|
| External Temperature Sensor | Supported | |
| Data Interface | USB2.0 Type-C | |
| Power Supply | 5v/12v | |
Customer Reviews
The high precision model doesn't fit on CarbonStar 150.
The adapter is not small enough.
Smaller than expected, you really need to watch video for the installation and even then in one video it was installed on the wrong side. It would be nice to have a separate application like for the focus motor of Celestron. Installed on a Askar fra400.
Great focuser, nice to be able to use manual focus at the same time!
I purchased this focuser to pair with my recent overseas Skywatcher 102 focus upgrade.
It mated easily to the available OEM from FLO and is so smooth I sometimes have to look to see if it is moving when slewing focus. It arrived in super fast shipping time Thanks to AllStar.
Everything hardware in the kit was supplied to redundancy so no issues with installation which took under 15 minutes. And it was supplied with enough variations and configurations that I cant see any issues mounting it on a number of telescopes. I was able to achieve true focus first time out, got my stars back and now look forward to in focus imaging all night.
A great purchase

Additional Articles, Videos, and Links

Astrophotography for Beginners Step 4: Shooting Deep-Sky Images
Taking deep sky pictures can be daunting, luckily there is an easy process to follow to allow you to get great shots! Here is the typical process for actually taking deep-sky images in the field.
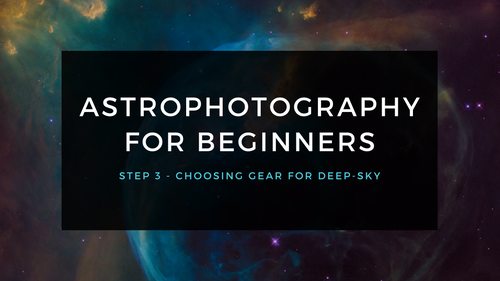
Astrophotography for Beginners Step 3: Choosing Gear for Deep-Sky Imaging
Using a star tracker gains you experience with the fundamentals of deep-sky imaging. Shooting the Moon gains you experience focusing and framing through your telescope. Through your sessions you’ll...

Astrophotography for Beginners - Start Here: Getting into Astrophotography Step by Step
Shooting the night sky has never been more popular, nor easier. The choice of equipment has also never been better, or more affordable. However, as per the advice given by Dickinson and Dyer in the...

Astrophotography for Beginners Step 1: Using the Star Adventurer Tracker
By far the most economical and easiest way to capture beautiful images of the Milky Way and large deep-sky objects like the Andromeda Galaxy (shown here) is to use a star tracker. Here are steps an...

Astrophotography for Beginners Step 2: How to Shoot the Moon
Close-ups of the Moon are rewarding, and an easy way to learn to shoot through your telescope. While good results are possible with a phone camera clamped to an eyepiece (as shown below), this tuto...