QHYCCD QHY5III462C (Color) Color and Enhanced Near Infrared Camera (QHY5III462C)
110078

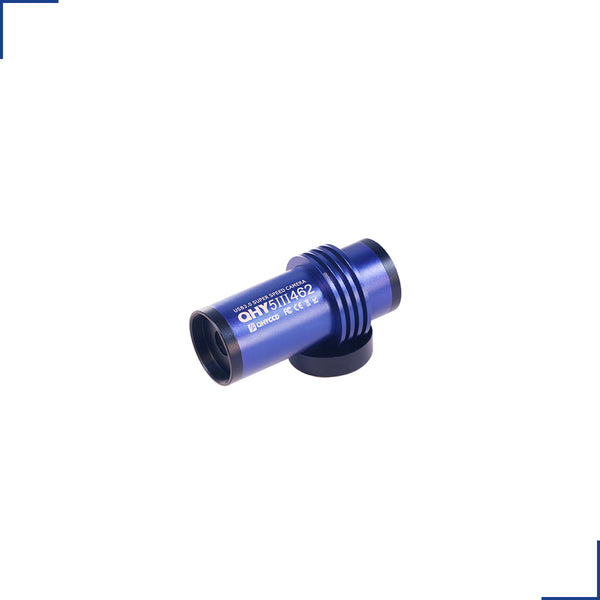


QHYCCD QHY5III462C (Color) Color and Enhanced Near Infrared Camera (QHY5III462C)
110078
Why Purchase from All-Star Telescope?
Free Expert Support
Whether you are a first timer needing help with setting up or an enthusiast that can't quite make that one thing work, our expert staff are ready to support your needs. With decades of knowledge and first hand experience we've been there and we can help you through it!
Stress Free, Secure Transactions
You can trust purchasing and delivery with All-Star Telescope. All of our transactions are 100% secure and Level 1 PCI DSS compliant thanks to Shopify's ShopPay platform. For additional protection, we insure 100% of the value of every shipment we make. If it get's lost during shipment, we replace it. If it gets damaged during shipment, we replace it. We make sure your product arrives exactly as you would expect it to; we promise.
We also ensure privacy protection. We never keep any of your credit card information on file and any of your personal data is stored according to our policies.
30 Day Return Policy
Buy with confidence knowing that we accept returns up to 30 days after purchase. We want you to have something you will actually use and we are confident that we keep good quality products in our store with No Junk.
Price Match Promise
Shipping around for the best price is tough, we make it easier by offering the best pricing in the market. But if you find a better price on an in-store item somewhere else we will match it!
Product Description
The QHY5III462C camera uses the latest (Sixth Generation) Sony 2.1 megapixel IMX462 STARVIS CMOS sensor. The pixel size is 2.9u making it the same size and resolution as the sensor used in the QHY5III290 camera that has been so successfully used for planetary imaging by some of the best planetary imagers in the world. Like other cameras in the 5III series, the QHY5III462C is USB 3.0 powered and controlled. No additional power is required.
The IMX462 sensor is back-illuminated and incorporates new technology that gives it some significant advantage over other planetary cameras: First, the IMX462 sensor has sHCG (Super High Conversion Gain) for very low read noise at high gain. This is ideal for stacking hundreds or thousands of short planetary images. Second, it is exceptionally sensitive in the NIR.
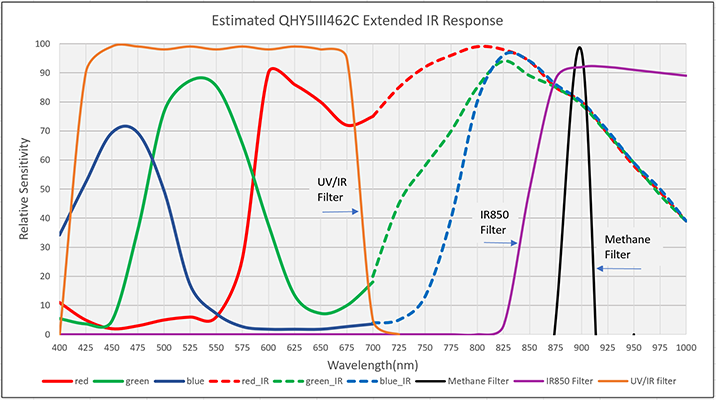
In this latest generation of sensors, the photodiode portion of the pixel well is physically deeper than in previous Sony BSI sensors, allowing photons of longer wavelength to penetrate deeper into the substrate. This dramatically increases the sensor’s sensitivity to red and near infrared (NIR) light. The RGB filters over the pixels become transparent at NIR wavelengths, so the sensor displays almost equal peak sensitivity to NIR light as it does to light in the visible spectrum.
The peak QE in the NIR around 800nm is as high as the peak QE in the visible wavelengths. For planetary imagers using a methane filter that passes light around 880nm this is welcome news.
BSI
One benefit of the back-illuminated CMOS structure is improved full well capacity. In a typical front-illuminated sensor, photons from the target entering the photosensitive layer of the sensor must first pass through the metal wiring that is embedded just above the photosensitive layer. The wiring structure reflects some of the photons and reduces the efficiency of the sensor.
In the back- illuminated sensor the light is allowed to enter the photosensitive surface from the reverse side. In this case the sensor’s embedded wiring structure is below the photosensitive layer. As a result, more incoming photons strike the photosensitive layer and more electrons are generated and captured in the pixel well. This ratio of photon to electron production is called quantum efficiency. The higher the quantum efficiency the more efficient the sensor is at converting photons to electrons and hence the more sensitive the sensor is to capturing an image of something dim.
Extended Near Infrared Sensitivity
Logically, one would think, each generation of Exmor sensor would be built upon and incorporate all of the improvements of the generation immediately preceding. However, this was not the case with the fifth generation Exmor R sensors.
The first back-illuminated sensors used shallower pixel wells (like the third-generation front- illuminated designs) than the physically deeper pixels of the fourth generation. So, while the back- illuminated structure increased the sensitivity in the visible range by 2X, the shallower pixels did not improve the NIR. The answer to this is seen in the latest, sixth generation, Sony Exmor R sensors, like the IMX462. Using physically deeper pixels in conjunction with the back-illuminated structure has dramatically improved the sensor’s sensitivity to both the visible and near infrared wavelengths.
sHCG Mode
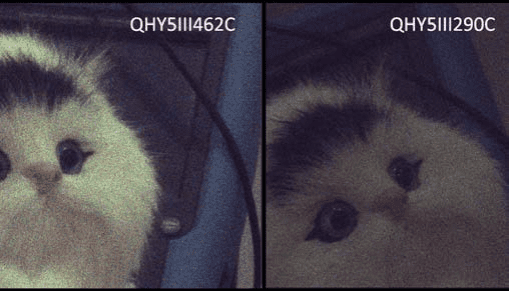
Another advantage of the QHY5III462 is the camera’s “Super High Conversion Gain” capability. By using a lower capacitance, a small amount of charge can be converted to a high voltage resulting in higher sensitivity in low-light conditions. The readout noise of the QHY5III462 in high gain mode is as low as 0.5 electrons!
The test exposures below demonstrate the low light improvement over the IMX290 sensor. The QHY5III462C image is on the left and the corresponding QHY5III290C image is on the right. The low light conditions and exposures are identical for each top and bottom pair of images and a UV/IR filter was in place for each camera. So this test demonstrates the QHY5III462C’s increase in sensitivity and SNR over the QHY5III290C under the same conditions in the visual light spectrum alone.
Color and Mono Imaging with One Camera
The filter matrix in the IMX462 uses organic dye filters. These filters are very efficient at visible wavelengths but become completely transparent in the NIR. For this reason, good RGB color balance requires an external UV/IR filter that blocks NIR wavelengths.
Many color cameras build this UV/IR filter into the camera or optical window for normal color imaging. However, in order to fully exploit the capabilities of the 462C sensor, in the QHY5III462C camera the optical window is AR coated only with no UV or IR blocking. Instead, the QHY5III462C camera includes two 1.25″ screw-in filters, a UV/IR cut filter to isolate the visible wavelengths for normal RGB imaging and an IR850 filter that will cut the visible wavelengths but pass wavelengths above 850nm.

What's in the Box
Specifications
| CMOS Sensor | SONY IMX462 CMOS |
| Pixel Size | 2.9um x 2.9um |
| Effective Pixel Area | 1920 x 1080 |
| Effective Pixels | 2 Megapixels |
| Fullwell | 12000e- |
| Readout Noise | 0.5e- |
| AD Sample Depth | 12-bit (output as 16-bit and 8-bit) |
| Sensor Size | Typical 1/2.8 inch |
| Full Frame Rate | Full Resolution135 FPS@8-bits (USB3.0 Port) |
| ROI Frame Rate | Higher rates at selected fields of interest (Supports any region ROI) |
| Exposure Time Range | 7us-900sec |
| Shutter Type | Electronic Rolling Shutter |
| Computer Interface | USB3.0 |
| Guide Port | Yes |
| Telescope Interface | 1.25-inch |
| Optic Window Type | Changeable 1.25-inch filter as optical window (Includes free 1.25-inch UV/IR cut filter and free 1.25-inch IR850 filter) |
| Back Focal Length | 12mm (±0.5) |
| Weight | 88g |



Additional Articles, Videos, and Links
Go Ahead, Look at the Sun (With the Right Equipment)
Solar observation and solar photography are a lot of fun with the right equipment, and this is a great time to start. Every 11 years the Sun’s magnetic field completely flips. That means that the...
Astrophotography for Beginners Step 4: Shooting Deep-Sky Images
Taking deep sky pictures can be daunting, luckily there is an easy process to follow to allow you to get great shots! Here is the typical process for actually taking deep-sky images in the field.
Astrophotography for Beginners Step 3: Choosing Gear for Deep-Sky Imaging
Using a star tracker gains you experience with the fundamentals of deep-sky imaging. Shooting the Moon gains you experience focusing and framing through your telescope. Through your sessions you’ll...
Astrophotography for Beginners - Start Here: Getting into Astrophotography Step by Step
Shooting the night sky has never been more popular, nor easier. The choice of equipment has also never been better, or more affordable. However, as per the advice given by Dickinson and Dyer in the...
Astrophotography for Beginners Step 1: Using the Star Adventurer Tracker
By far the most economical and easiest way to capture beautiful images of the Milky Way and large deep-sky objects like the Andromeda Galaxy (shown here) is to use a star tracker. Here are steps an...
Astrophotography for Beginners Step 2: How to Shoot the Moon
Close-ups of the Moon are rewarding, and an easy way to learn to shoot through your telescope. While good results are possible with a phone camera clamped to an eyepiece (as shown below), this tuto...

